# Areas and function blocks
Schlagwörter: Session, Room, Sound, Image, Video, CameraOn the session workspace, you work with tools and formats and can connect to others via audio and video transmission.
There are various areas and buttons in online sessions, which are described below.
![]()
# Header bar, bar with session participants
Information about the participants in the session is displayed at the top of the session workspace. General session controls are also displayed on the left.
# Button with general controls for the session
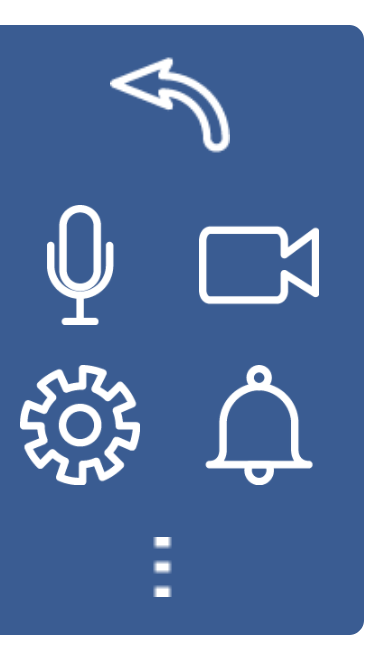
This area provides access to the following functions:

Leaving the session: Data entered is saved automatically and is not lost. If you accidentally or intentionally leave the session, you can simply rejoin it without losing any data.

Audio and video communication: You can switch on your microphone/headset and camera here to communicate with others.

Device configuration microphone and camera: Change settings for which camera, microphone and loudspeaker are to be used.

Notifications by standard e-mail: Button for notifying session participants. All group members receive an automated (non-editable) email to notify them of changes in the session.

Menu with additional functions. Click on the icon to access further menu items (e.g. breakout sessions). The menu items displayed differ depending on your authorizations in the session.
# Session participants who are currently online
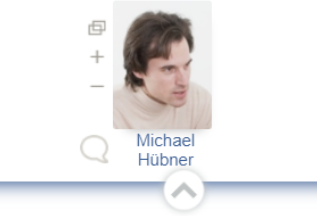
People who are currently online in the session are displayed here with their portraits and names. The portraits can be defined outside the session via "My account" (prerequisite: no guest, personal account has been created).
As soon as the camera is activated, the live video images are displayed for the person in question instead of the static portrait photos.
Clicking on + and - next to the photo or video image enlarges or reduces the view by one level respectively.
The photo or video image can be removed from the bar by clicking on  and moved anywhere in the
browser window to any desired position.
and moved anywhere in the
browser window to any desired position.
If the microphone is switched on, this is displayed and the level is shown to the left of the photo/video image when speaking. The microphone can be muted by clicking on it.
The display of the video images can be changed in the Session settings: Single-line display, tile view.
# Session participants who are offline and pop-up notifications

The meeting participants who are currently offline are listed on the right-hand side but have access to the session. This information is important in order to be able to assess who can still access the session content at another time.
The area can be opened and hidden by click on „>“. Collapsing can be useful in larger groups, for example, to see additional (video) images.
The icon for Ad-hoc sessions is active as soon as a guest is in the waiting room. Clicking on it then takes you to the waiting room administration. If the waiting room is empty, the icon for Ad-hoc sessions is grayed out as shown in the illustration.
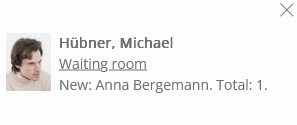
Current events such as the entry of another group member or the arrival of a chat message are displayed in a pop-up window for approx. 10 seconds. These are also displayed in this area and temporarily overlay the offline participants. Ordinary information closes automatically after a few seconds, error messages remain until you click on them. Clicking on the message closes the notification. If the notification relates to a tool, the tool title is displayed and can also be clicked to quickly switch to this tool.
# Button for showing or hiding the header bar.
The button with the arrow at the bottom of the header bar can be used to collapse the bar. The remaining workspace automatically uses the space gained. Folding away the participant bar therefore enables better concentration on the tools in smaller displays. If the header bar is to be collapsed again, this can be done by clicking on the arrow again.
# Information about the session

Display of session information: session and group name, description of the session, etc.
Additional direct access to further functions: Leave workspace, convert session content as .PDF and make it available for saving/printing.
# Sidebar
# Display and change the session format

The available tools are defined in the session format. The corresponding process is also displayed to licensees. The available formats are defined via the purchased license. Group leaders and co-group leaders can change the available formats during the session. You then have the choice of whether the format should only be changed for you or for all participants in the session.
# Tools
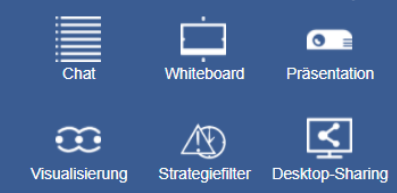
Tools can be added to the workspace by clicking on the desired tool type. Then select the desired heading with which the tool should appear in the workspace.
# Button for showing or hiding

Similar to the header bar, the sidebar can also be folded away. As a result, the newly gained space is automatically used for the tools.
The sidebar can also be completely hidden for contacts and guests in a session via the session settings.
# Workspace
On the large white area visible in the session image above, participants work on the session content at the same time. Tools are added to the session for this purpose (e.g. a whiteboard) and work then takes place within the tools. Each person can synchronously see every action that another person performs on their workspace. The contents of this workspace are automatically saved immediately and are not lost.