# Audio & Video: Seamless Communication
Keywords: audio, sound, microphone, camera, video mode, video display, device configuration microphone and camera, camera control, microphone control, virtual background camera, hide camera background, camera/microphone blocked by browserExperience collaboration as if you were there in person. In addition to the chat, our platform offers a high-performance audio and video environment, allowing you to focus entirely on your content and your counterpart.
Expand Table of Contents
Prefer watching?
movie Video Tutorial: Activating and Configuring Audio and Video
In this video, you will learn how to set up your camera and microphone and how to admit guests from the waiting room into the session.
# No Installation Required - Browser-Only
Good news: You don't need to install any additional software. Voice and image transmission happens directly in your browser. To ensure everything runs smoothly, please take a quick look at our System Requirements.
# Securely Managing Browser Access
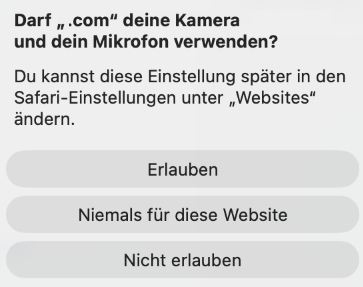
Your privacy is highly valuable. Therefore, your browser explicitly asks for permission before accessing your camera or microphone.
| Safari | Edge/Chrome | Firefox |
|---|---|---|
 |  |  |
# Ready in Seconds: Device Configuration Microphone and Camera
To get you started right away, a configuration dialog is offered as soon as you enter a session (depending on the settings defined by the hosts). This ensures you are perfectly audible and visible from the very beginning.
Nevertheless, you can access the device configuration for microphone and camera at any time via the gear icon.
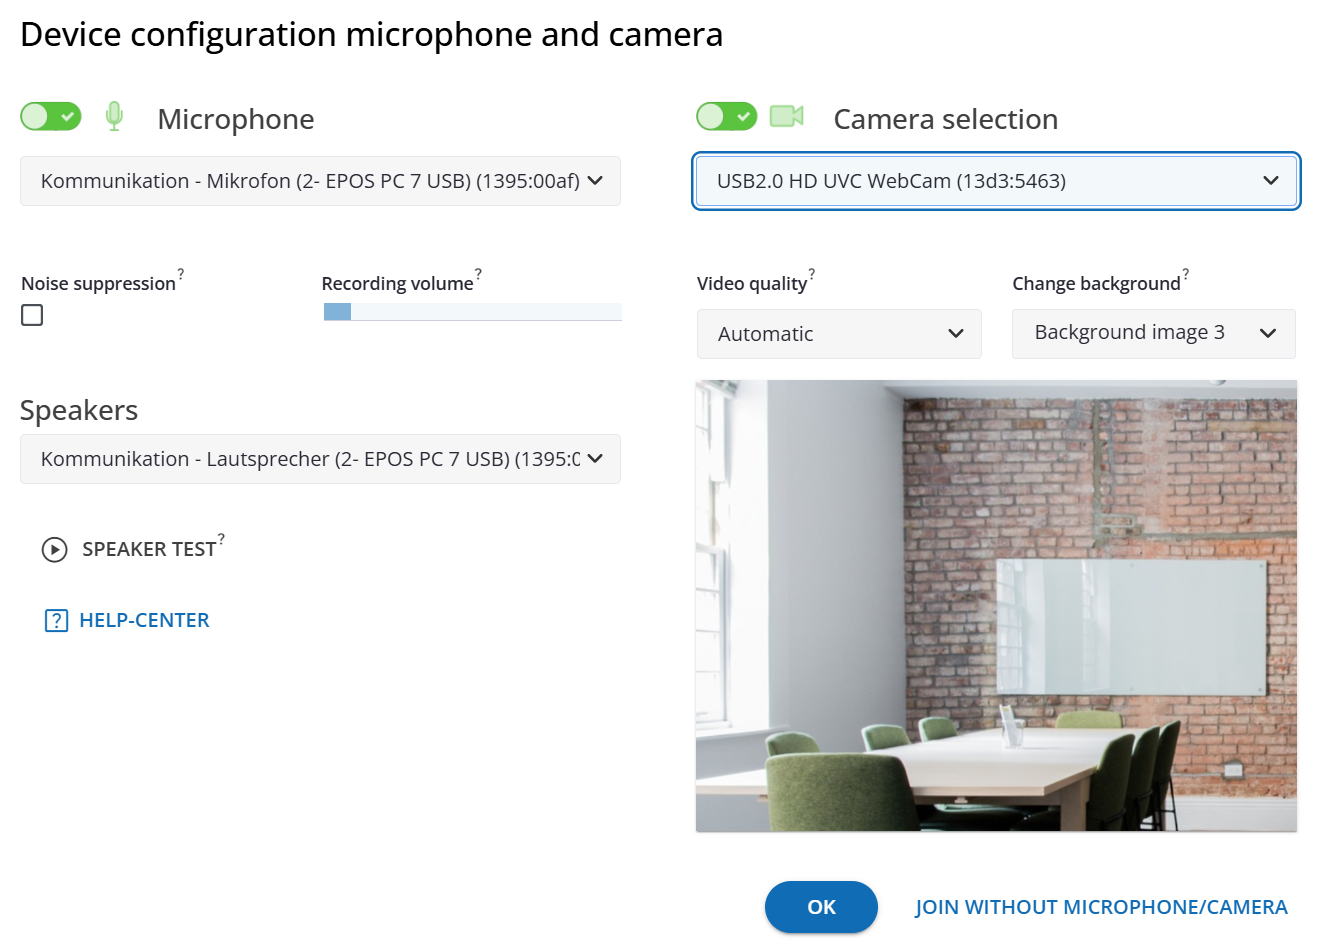
- check mic Microphone and check videocam Camera
Quick Check: Enable or disable your microphone and camera with just one click. - Hardware Selection: Choose from your available devices (e.g., a headset instead of the laptop microphone).
- Privacy First: Click OK to start the transmission. Prefer to just listen? Select Join without microphone/camera.
# Advanced Settings for Your Professional Presence
Customize your setup to suit your individual needs:
Audio Check: Use the Recording volume level to immediately see if your selected microphone is picking up your voice correctly. Use the Speaker test to ensure that audio is being output through the desired headset or the correct speaker.
Change background (Edge/Chrome only):
Use virtual backgrounds to professionally hide your surroundings—choose between a blur effect or a background image.Note for macOS users: we recommend using the system's own Virtual Background feature for your camera feed instead.
Attention: This feature requires additional processing power and should remain disabled on lower-performance computers.
Video Quality: Adjust the resolution to match your internet connection if necessary. Usually, no manual adjustment is required—the setting can remain on Automatic.
Multiple Camera Access
A camera can typically only be used by one application at a time. If your video remains black, please check if another video conferencing program is accessing your camera in the background and close it.
Speaker Selection Tip
If playback is not possible within the device configuration, please switch the playback device directly in your operating system's sound settings.
# Full Control During the Session
You decide at any time how much you want to share. The controls are conveniently located in the session header.
movie Video Guide: Activation & Configuration

| Icon | Function | Your Benefit |
|---|---|---|
| mic | Microphone | Mute or activate your audio. Tip: In large groups, it is recommended to only activate the microphone when you are actually speaking. |
| videocam | Camera | Start or stop your video feed. Note: Deactivating the camera saves bandwidth on weaker internet connections. |
| settings_video_camera | Device Configuration | Switch flexibly between different headsets or cameras – even during the session. |
| monitor | Video Mode | Optimal display of participants: Use gallery mode for video feeds, or should the tools take center stage? Note: After a change, hosts will be asked if they want to adjust the view for all other participants as well. This allows everyone to switch together, for example, from a large gallery view during check-in to a space-saving single-row view while working with tools. |
Interaction at a Glance
Would you like to know how to enlarge, move, or arrange the video feeds of other participants? Detailed information on managing other video feeds can be found in the chapter Areas and Function Blocks.
# What to do if things get stuck?

# arrow_right_alt Allow access in browser settings
The procedure varies depending on the browser you are using:
Apple Safari Camera and Microphone Settings
(Click to expand)
If access was denied in Safari, you can correct it depending on your device as follows:
# macOS (Desktop) Method 1: Via the Address Bar (Quick Access)
- Right-click (or Ctrl-click) the website URL in the address bar.
- Select "Settings for This Website...".
- Set Camera and Microphone to Allow in the pop-up menu.
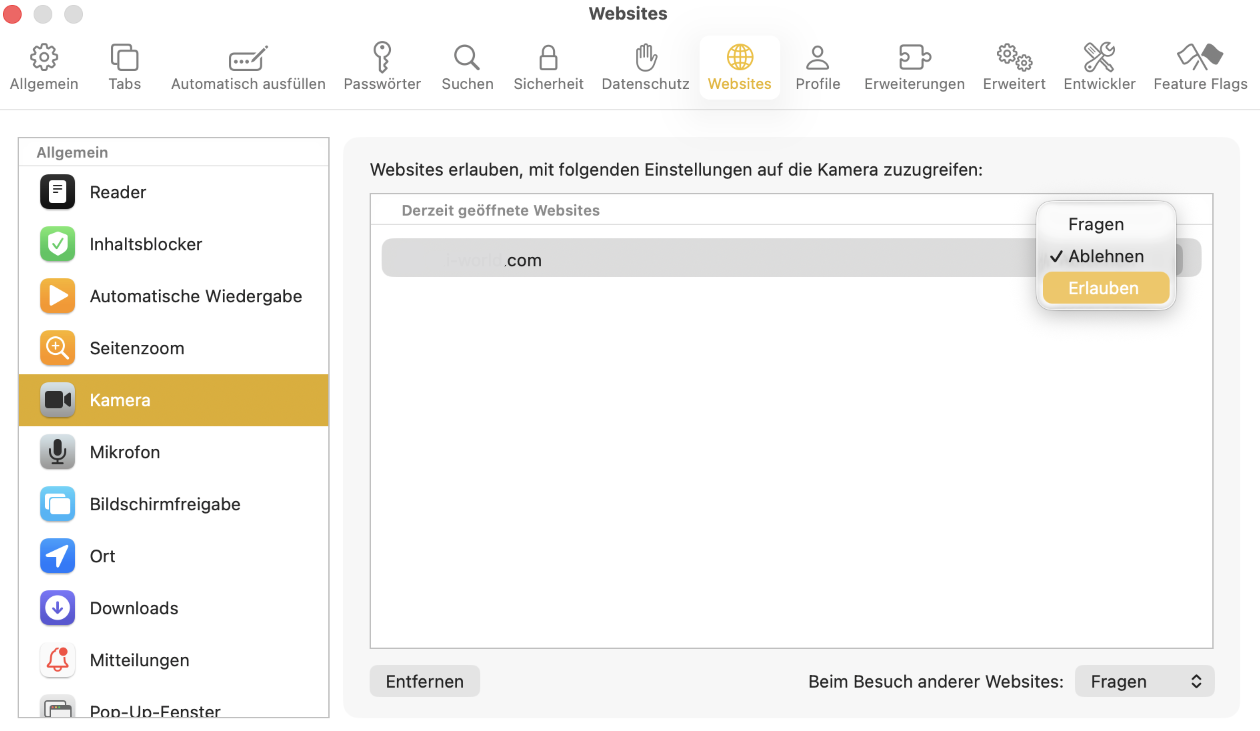
# macOS (Desktop) Method 2: Via Safari Settings
- Open the menu at the top: Safari > Settings... (or press
Cmd + ,). - Click the Websites tab.
- Select Camera or Microphone from the list on the left.
- Find the current website in the list on the right and change the status to Allow.
# iOS & iPadOS (iPhone/iPad)
On mobile devices, permissions are managed directly in the system settings:
- Open the Settings app.
- Scroll down to Safari.
- In the "Settings for Websites" section, look for Camera and Microphone.
- Set the access for each to Allow.
Note: Ensure that general access in these menus is not set to "Deny," otherwise the website cannot ask for permission again.
Microsoft Edge / Google Chrome Camera and Microphone Settings
(Click to expand)
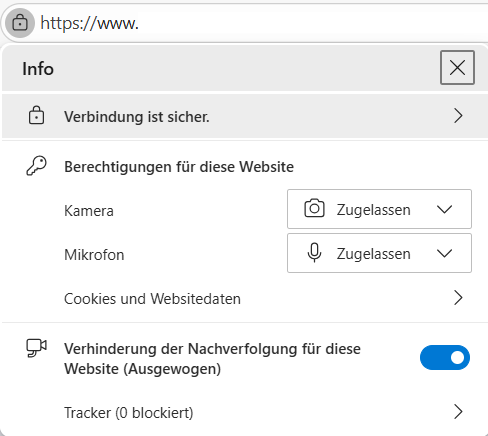
If access is blocked in Edge or Chrome, you can adjust the permissions directly via the address bar:
- Click the lock lock icon to the left of the web address.
- Select "Permissions for this site" from the menu.
- Look for Camera and Microphone in the list.
- Set both drop-down menus on the right to Allow.
Mozilla Firefox Camera and Microphone Settings
(Click to expand)
In Mozilla Firefox, you can manage blocked permissions directly via the icons in the address bar:
- Click the videocam_off camera icon or the mic_off microphone icon on the left side of the address bar.
- Remove the block by clicking the X next to the restriction.
- Reload the page (F5). Firefox will now ask you again to share your camera and microphone.
Tip: You can also click the discover_tune settings icon in the address bar to view active site permissions.
With updated settings
Reload the page briefly, and you’ll be "on air" again.
# Do you need further assistance?
If you have configured the settings mentioned above and still experience issues with the transmission, you will find specific assistance in our question_exchange FAQ. It covers the most common causes of errors as well as solutions for browser permissions and hardware conflicts.
Helpful Links
- question_exchange FAQ: Resolving audio and video problems
- movie Video Tutorial: Activate and configure audio and video